Windowsのビルドは依存が多くて実は結構大変です

最近tree-mapsをリニューアルしたのですが、WEB版だけでなくデスクトップアプリも欲しかったので、Electronに手を出してみる事にしました。
ビルド設定
node_modues
以下の2つのモジュールをインストールします。yarnを使っていない方はnpm install -Sに置き換えて下さい。
yarn add electron-prebuilt electron-packager --dev
electron実行用js
以下は実際にtree-mapsで使っているものを少し整形したものです。
解りやすいように electron.js としてファイルを保存して下さい。
const {app, BrowserWindow, Menu, session} = require('electron');

let mainWindow = null;
app.on('window-all-closed', function () {
    app.quit();
});

app.on('ready', function () {
    mainWindow = new BrowserWindow({
        width: 1000,
        height: 600,
        webPreferences: {
            defaultFontFamily: {
                standard: 'Noto Sans JP',
                serif: 'Noto Sans JP',
                sansSerif: 'Noto Sans JP',
                monospace: 'Noto Sans JP'
            }
        }
    });
    // WebView的なロードを行う
    mainWindow.loadURL('https://www.tree-maps.com/');
    mainWindow.on('closed', function () {
        // アプリ終了時にキャッシュをクリアする
        session.defaultSession.clearCache(() => {})
        mainWindow = null;
    });

    var template = [{
        // ショートカット
        label: "Application",
        submenu: [
            {label: "About Application", selector: "orderFrontStandardAboutPanel:"},
            {type: "separator"},
            {
                label: "Quit", accelerator: "Command+Q", click: function () {
                app.quit();
            }
            }
        ]
    }, {
        // コピペを有効化
        label: "Edit",
        submenu: [
            {label: "Undo", accelerator: "CmdOrCtrl+Z", selector: "undo:"},
            {label: "Redo", accelerator: "Shift+CmdOrCtrl+Z", selector: "redo:"},
            {type: "separator"},
            {label: "Cut", accelerator: "CmdOrCtrl+X", selector: "cut:"},
            {label: "Copy", accelerator: "CmdOrCtrl+C", selector: "copy:"},
            {label: "Paste", accelerator: "CmdOrCtrl+V", selector: "paste:"},
            {label: "Select All", accelerator: "CmdOrCtrl+A", selector: "selectAll:"}
        ]
    }
    ];

    Menu.setApplicationMenu(Menu.buildFromTemplate(template));
});
icnsファイルの生成
electronアプリの実行ファイルに設定するアイコン画像は、icnsという特殊な形式のものを使います。macでicnsを生成するには「iconutil」を使います。
iconutilでiconsを作るわけですが、16px, 32px, 64px, 128px, 256px, 512px, 1024px のpngファイルが必要なので事前に用意しておいて下さい。
それらを以下のような構造にまとめます。
.
└─ ${アプリ名}.iconset
       ├── icon_128x128.png
       ├── icon_128x128@2x.png
       ├── icon_16x16.png
       ├── icon_16x16@2x.png
       ├── icon_256x256.png
       ├── icon_256x256@2x.png
       ├── icon_32x32.png
       ├── icon_32x32@2x.png
       ├── icon_512x512.png
       └── icon_512x512@2x.png
tree-mapsの場合は「tree-maps.iconset」というフォルダを作り、その中に画像を配置しました。
この状態で、以下のように実行すると、icnsファイルが生成されます。
iconutil -c icns tree-maps.iconset
成果物として「tree-maps.icns」というファイルが生成されます。これを次項で使用します。
アプリ実行・ビルド等のタスク設定
package.jsonのmainとscriptsセクションを以下のようにします。この例ではwebpackを使用するので、「yarn add webpack --dev」等でインストールして下さい。
  "main": "electron.js",
  "scripts": {
    "build": "NODE_ENV=product webpack --progress --color",
    "app": "electron .",
    "package": "NODE_ENV=product electron-packager . tree-maps --out=dist --platform=darwin,wind32--arch=x64 --icon=tree-maps.icns --overwrite"
  },
※ この記事ではビルドは64bit版で行うものとします。
appタスクはパッケージングせず、直接electronアプリを実行します。主にデバッグ用途で使用します。
electronアプリを配布する際は、まずbuildタスクを実行して各種成果物を生成し、その成果物をpackageタスクでパッケージングします。
electron-packagerには沢山の引数がありますが、それぞれ以下のようになります。
| out | パッケージングの出力先パス |
|---|---|
| platform | darwinはmac、win32はwindowsです |
| arch | 32bitか、64bitか |
| icon | 実行ファイルのアイコン |
| overwrite | 上書きする |
mac版のビルド手順
yarn build && yarn package
macの場合はこれだけで、distフォルダ配下に実行可能ファイルが生成できます。非常に簡単です。
windows版のビルド手順
実は、macでwindowsのビルドの行うのはちょっと手間がかかります。
macでwindowsのパッケージングをするには、おおまかに「homebrew」「xquartz」「wine」のインストールが必要になります。
homebrewのインストール
以下の「インストール」にワンライナーのインストールコマンドがあるので、インストールします。
brew.sh
xquartzのインストール
$ brew cask install xquartz
Uninstalling brew-cask... (5,904 files, 3.2MB)
Warning: The default Caskroom location has moved to /usr/local/Caskroom.

Please migrate your Casks to the new location and delete /opt/homebrew-cask/Caskroom,
or if you would like to keep your Caskroom at /opt/homebrew-cask/Caskroom, add the
following to your HOMEBREW_CASK_OPTS:

  --caskroom=/opt/homebrew-cask/Caskroom

For more details on each of those options, see https://github.com/caskroom/homebrew-cask/issues/21913.
==> Downloading https://dl.bintray.com/xquartz/downloads/XQuartz-2.7.11.dmg
######################################################################## 100.0%
==> Verifying checksum for Cask xquartz
==> Running installer for xquartz; your password may be necessary.
==> Package installers may write to any location; options such as --appdir are ignored.
Password:
==> installer: Package name is XQuartz 2.7.11
==> installer: Installing at base path /
==> installer: The install was successful.
🍺  xquartz was successfully installed!
wineのインストール
非常に依存モジュールが多く、インストールが長く、インストールする依存の中には503エラーでタイムアウトするものもあります。503の場合は時間を置いて再度brew installしてみて下さい。
tree:certbot tree$ brew install wine
==> Installing dependencies for wine: libpng, freetype, jpeg, libtool, libusb, libusb-compat, fontconfig, libtiff, webp, gd, libgphoto2, little-cms2, cmake, jasper, libicns, makedepend, openssl, net-snmp, sane-backends, libtasn1, gmp, nettle, libunistring, libffi, p11-kit, gnutls
==> Installing wine dependency: libpng
==> Using the sandbox

・・・snip・・・

By default Wine uses a native Mac driver. To switch to the X11 driver, use
regedit to set the "graphics" key under "HKCUSoftwareWineDrivers" to
"x11" (or use winetricks).

For best results with X11, install the latest version of XQuartz:
  https://xquartz.macosforge.org/
==> Summary
🍺  /usr/local/Cellar/wine/2.0: 4,297 files, 461.9MB
パッケージングしてみる
yarn build && yarn package
パッケージングのコマンド自体はmacと同様(というかmacとwinを同時にビルドするよう前項でpackage.jsonを設定しました)です。
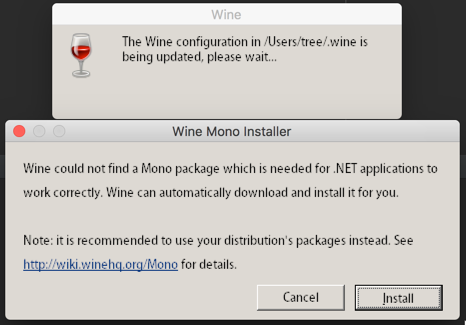
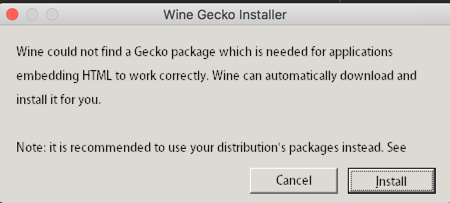
が、ビルド中に、ここから更に「mono」「Gecko」のインストールを求められます。monoは、macでwindowsのバイナリを生成するためのものでお馴染みのアレです。
パッケージング中に以下のダイアログが自動で起動するので、全てインストールしちゃって下さい。


3つ目のダイアログの Install をクリックすると、パッケージング処理が続行して、無事exeを生成する事ができます。
macとwindowsの64bit版をパッケージングすると、以下のような成果物が出力されます。

macの方は「アプリ名.app」単体で起動しますが、windowsはフォルダの中のdll等は全て必要なので、exeファイル単体で配布せず、ディレクトリごと配布して下さい。
エラー集
Make sure that the "wine" executable is in your PATH.
yarn packageする時に、wineがインストールされていない場合に発生します。wineをインストールしましょう。
$ yarn package
yarn package v0.20.3
$ NODE_ENV=product electron-packager . tree-maps --out=dist --platform=win32 --arch=x64 --icon=tree-maps.icns --overwrite
Packaging app for platform win32 x64 using electron v1.4.13
Could not find "wine" on your system.

Wine is required to use the app-copyright, app-version, build-version, icon, and
win32metadata parameters for Windows targets.

Make sure that the "wine" executable is in your PATH.

See https://github.com/electron-userland/electron-packager#building-windows-apps-from-non-windows-platforms for details.
error Command failed with exit code 1.
wine: XQuartz is required to install this formula.X11Requirement unsatisfied!
wineのインストールをするには xquartz のインストールが必須のようです。xquartzをインストールしましょう。
tree:certbot tree$ brew install wine
Updating Homebrew...
wine: XQuartz is required to install this formula.X11Requirement unsatisfied!

You can install with Homebrew-Cask:
  brew cask install xquartz

You can download from:
  https://xquartz.macosforge.org
Error: An unsatisfied requirement failed this build.
curl: (22) The requested URL returned error: 503 first byte timeout
brew install中に以下のように503エラーが発生する場合があります。これはhttpステータスコード通り、サーバが混み合っているだけですので、少し時間が経ったら再びbrew installして下さい。
==> Installing wine dependency: sane-backends
==> Downloading https://fossies.org/linux/misc/sane-backends-1.0.25.tar.gz
######################################################################## 100.0%
==> Downloading https://raw.githubusercontent.com/Homebrew/formula-patches/6dd7790c/sane-backends/1.0.25-missing-types.patch

curl: (22) The requested URL returned error: 503 first byte timeout
Error: Failed to download resource "sane-backends--patch"
Download failed: https://raw.githubusercontent.com/Homebrew/formula-patches/6dd7790c/sane-backends/1.0.25-missing-types.patch
雑感
今回はmacとwindowsのデスクトップアプリを作るのが目的でelectronを採用しましたが、electronって目茶苦茶簡単ですね。とりあえず起動すればいい程度なら、前述の electron.js のみで起動しちゃいます。windowsのパッケージングが色々不便なので嫌ですが、mac版のパッケージングはシンプルで非常に良いですね。
なお、electronはgoogle先生のchromiumが利用されており、chromeとして起動するので、「IEだけデザイン崩れする!」等が起きないので、デザイン周りでも非常に楽です。しかし、chromium自体のファイルサイズが大きいので、生成されるバイナリ・その他諸々のファイルサイズがどうしても大きくなってしまうのが難とも言えます。
ちなみにですが、electronを使用しているアプリには「slack」「atom」「VisualStudioCode」等、有名ソフトでも使われています。
今回はパッケージング時にコードサイニングを行っていないので、システム環境設定 -> セキュリティとプライバシー -> 一般タブ -> ダウンロードしたアプリケーションの実行許可から許可する必要があるので注意して下さい。
おまけ
私はtree-mapsというサイトを開発していて、ReactでSPAで作っています。今回Electronを使ってアプリ化してみたので、よかったらダウンロードしてみて下さい。